Having trouble?
Try reloading the application.
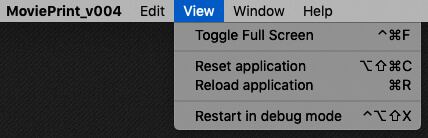
MoviePrint window menu -> View -> Reload application
If this did not help, reset the application.
Note that you will lose all application data!
MoviePrint window menu -> View -> Reset application
See also our known issues page for other startup issues.
If all this did not help or if you have any other questions or comments:
Get in touch
Minimum requirements
Software
Windows 7 and later | Tested on Windows 10
MacOS 10.11.6 and later | Tested on MacOS 10.11.6
Hardware
Note for MacBook M1 and M2 processors: Due to a Rosetta 2 crash only MoviePrint 0.2.12 and versions below are supported. Unfortunately I have no time to fix this.
A CPU with AVX support is required (since MoviePrint 0.2.14) due to the introduction of face detection using a machine learning framework.
Users with older CPUs, please install MoviePrint 0.2.12.
What is MoviePrint?
MoviePrint is a tool to create screenshots (MoviePrints) of entire movies in an instant.
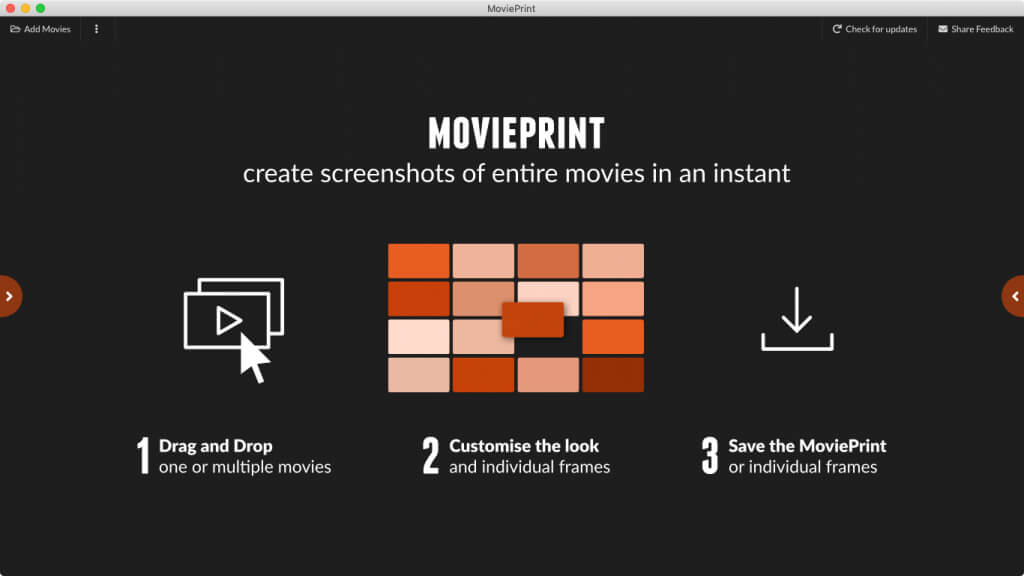

What is a MoviePrint?
A MoviePrint is an image made out of screenshots of a movie. It helps you present, analyse or remember movies with the help of a single image.
- If you have lots of movies and try to keep an overview,
- Or you want to get a feel of a movie, its color or pace,
- Or you want to include some moods of movies in a presentation. In all these cases MoviePrints are helpful.
Get started
1. Drag in one or more movies
- The first movie is automatically displayed as a MoviePrint, where frames from the movie are captured in a regular interval
- The other movies can be accessed by opening the movie list – click on the orange arrow on the left border
2. Customise the look
- MoviePrint settings
- Use the add MoviePrint buttons in the floating menu or
- Open the settings menu to
- Change the column and row count and click Apply
- NOTE: If you only want to change the column count while keeping exactly these captured frames, you can unselect Change thumb count.
- Change margin and other options
- Change output path size and format
- Thumb specific settings
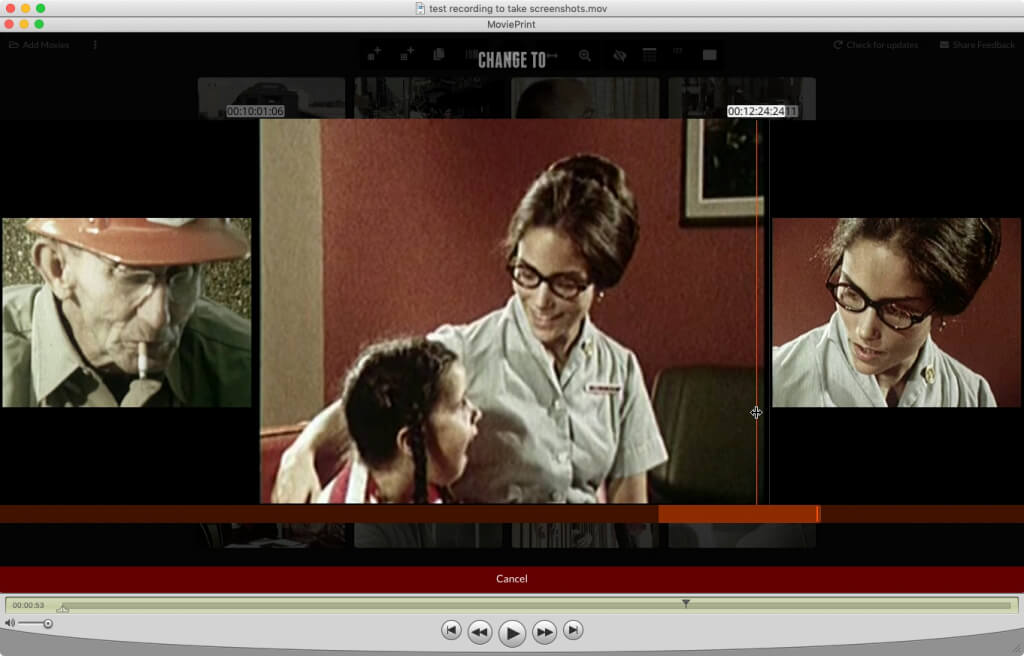
- Change the in- and outpoint for the movie via the IN and OUT buttons
- NOTE: Setting In and Outpoints will change all thumbs. So it is best to do that before you manipulate the individual thumbs.
- Change the frame of every single thumb via the scrub button <|> (click and drag)
- Add thumbs before or after via the + button
- Hide the thumbs via the HIDE button
- Move the thumbs around via drag and drop
- Change the in- and outpoint for the movie via the IN and OUT buttons
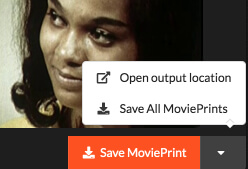
3. Save the MoviePrint
- or save all MoviePrints via the arrow to the right of the Save MoviePrint button
Documentation
Types of MoviePrints
- Interval based (default) for quickly selecting a couple of nice frames
- Shot based for a more accurate representation of your movie.
Interval based (default)
- Frames are chosen based on a standard interval
- The interval is only used initially. After that you are free to add and hide thumbs wherever you like and also rearrange them at will.
Of course switching between grid and timeline view is possible for both types. But only the shot based type has the notion of shots which makes the timeline view more valuable for this type.
Shot based
- An algorithm detects the shots of the movie (simple shot segmentation through luminance/saturation mean difference)
- When you create a shot based MoviePrint of a movie for the first time, the movie gets scanned. This can take some time. The speed depends both on the length and the resolution of the movie.
- Every thumb represent a detected shot
- By default the middle frame of the detected shot is used
- Use the cut/merge mode in the player view to manually improve the segmentation
- Use the change thumb mode in the player view to choose a different frame for the thumb
- The shot based MoviePrint is constrained to the detected shots. To be able to change the order and add thumbs in between, you can convert it to an interval based MoviePrint. See MoviePrint item
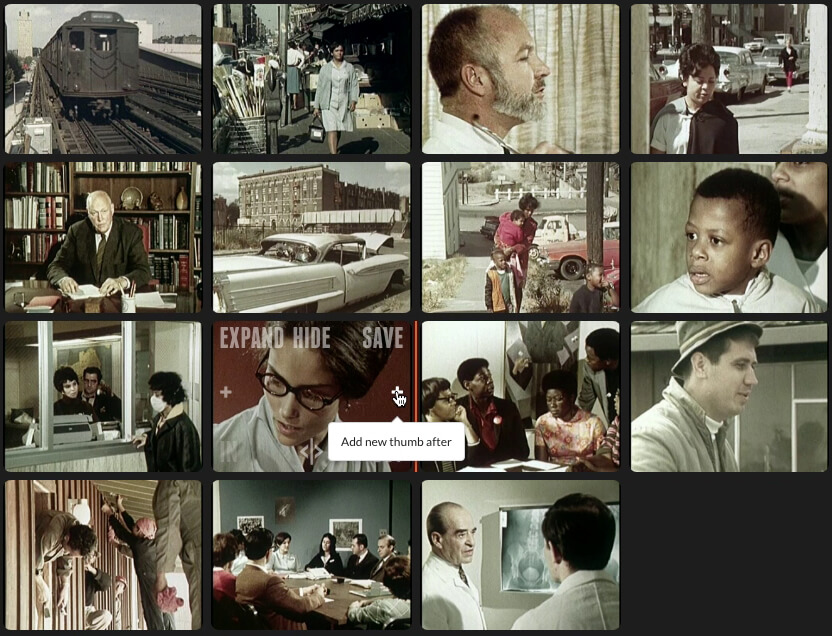
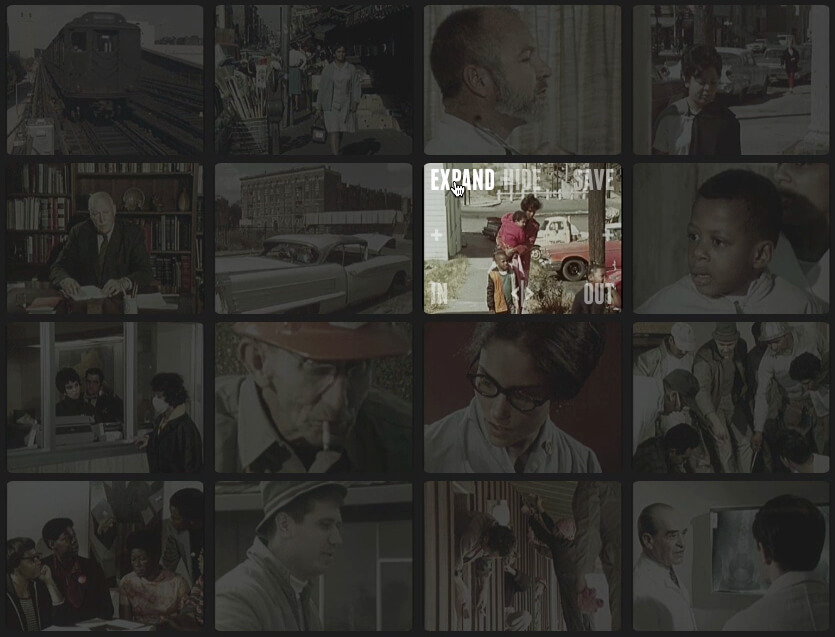
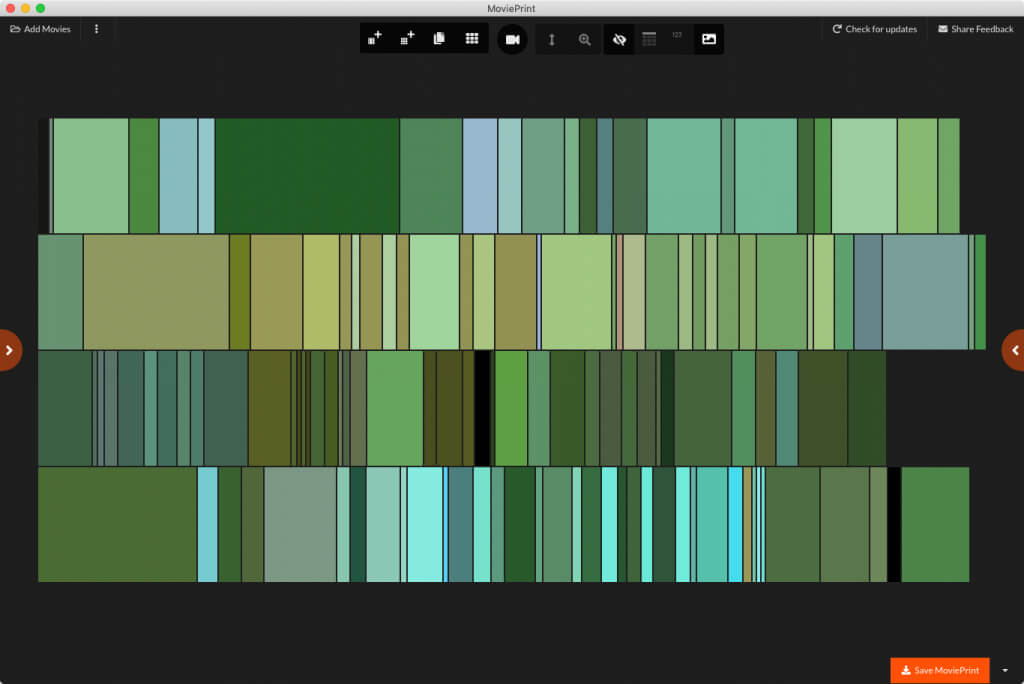
Grid view
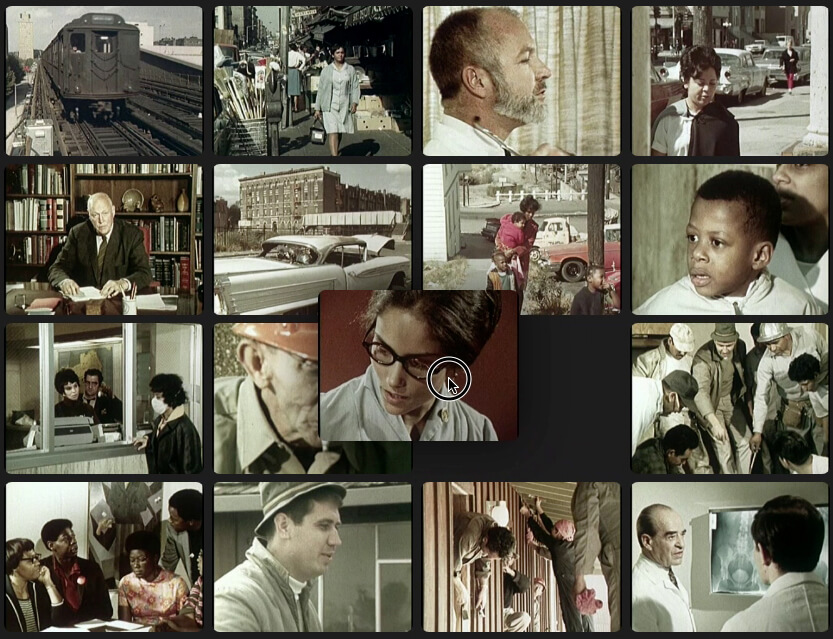
Thumbs are shown in a grid. All thumbs have the same size. The grid dimensions, the margin and the thumb shape can be changed in the Settings menu
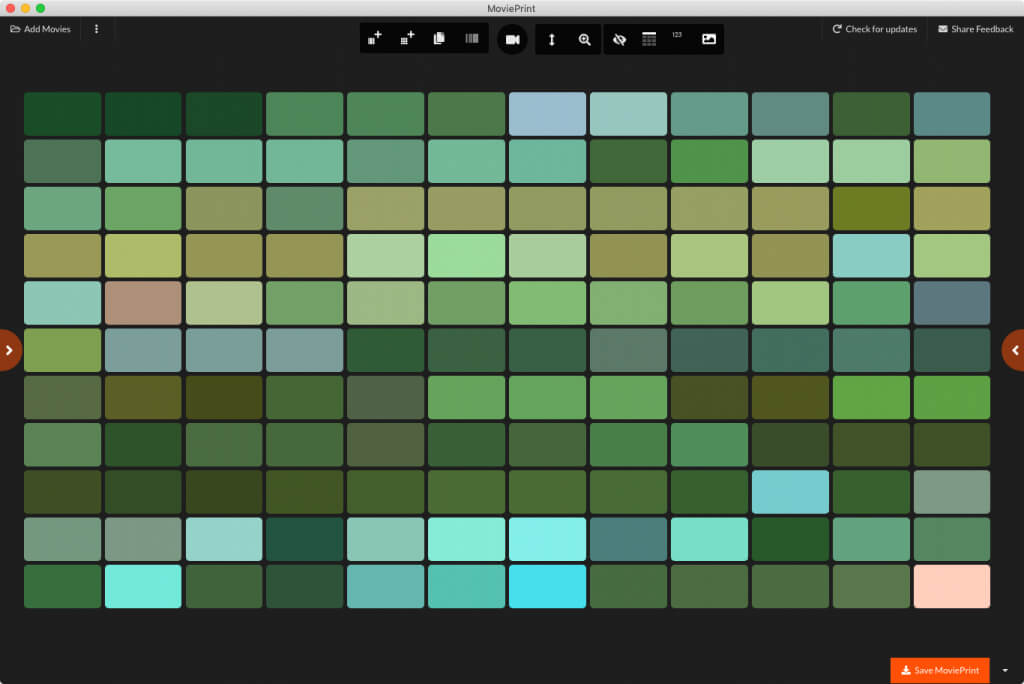
Hovering over a thumb reveals some options to customise the grid.
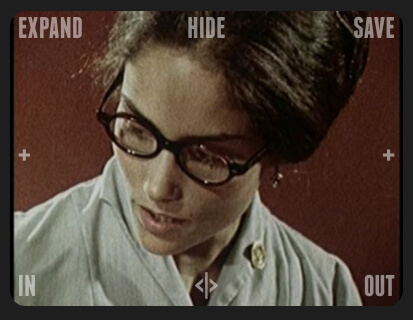
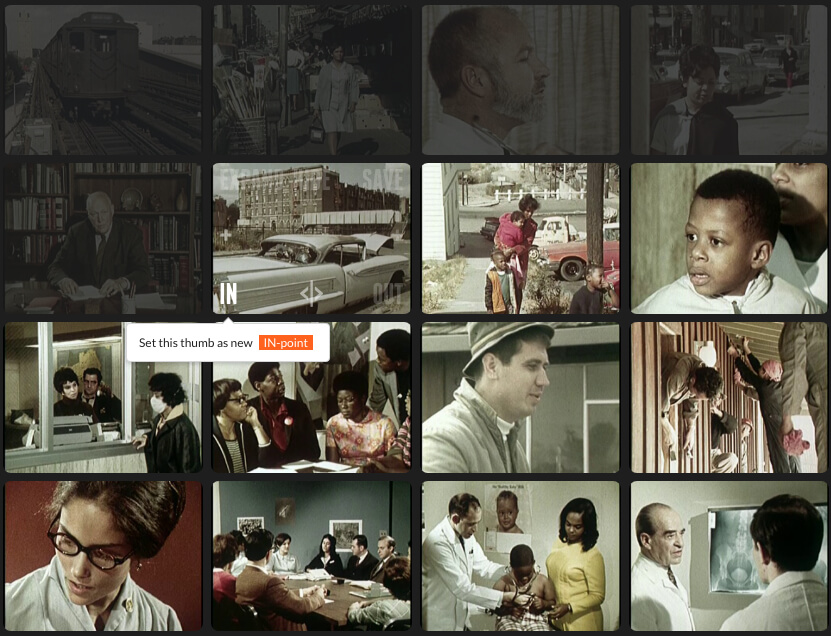
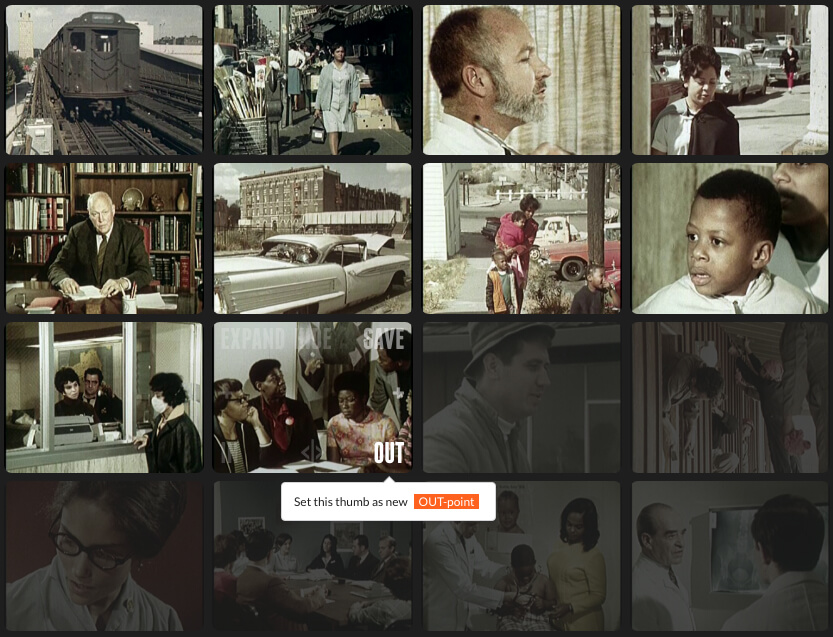
- Set In- and Outpoints
- For interval based MoviePrints – Sets this thumb as the new Inpoint/Outpoint for the MoviePrint and grabs new thumb images
Note that previous manual selections will be lost - For shot detection based MoviePrints – Hides all scenes before/after this one
- For interval based MoviePrints – Sets this thumb as the new Inpoint/Outpoint for the MoviePrint and grabs new thumb images
- Add new thumb before/after – This adds a thumb right in-between the previous/next and this thumb (only for interval based MoviePrints)
- Expand – Create a new MoviePrint using the In and Outpoints of this scene
- Hide/Show a single thumb/scene
- Save – Saves this thumb image in original resolution in the folder specified in the settings menu on the right
- Scrub <|> – This let’s you choose a different frame for this thumb
- Drag – Clicking and dragging anywhere else in the thumb let’s you move it to another position in the grid (only for interval based MoviePrints)
Timeline view
The length of the scene defines the width of the thumb. Minutes per row, scene width, minimum scene width and the margin can be changed in the Settings menu
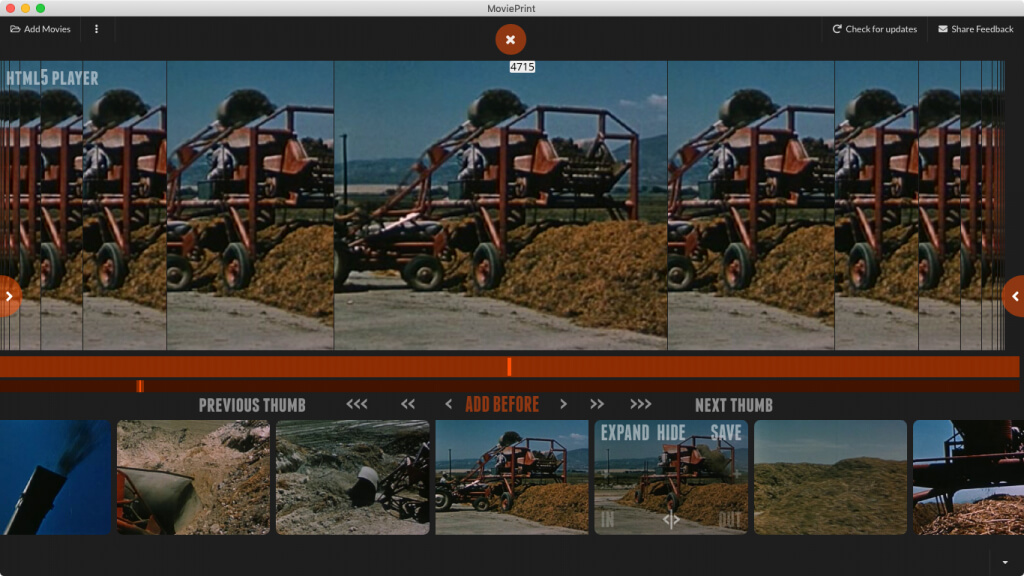
Player view
The Player view is used to
- Cut/Merge scenes to manually improve the shot detection
- Change the frame for a thumb by scrubbing on a timeline
- Open HTML5 player (not all movie formats are supported)
- Play movie in fullscreen and with audio
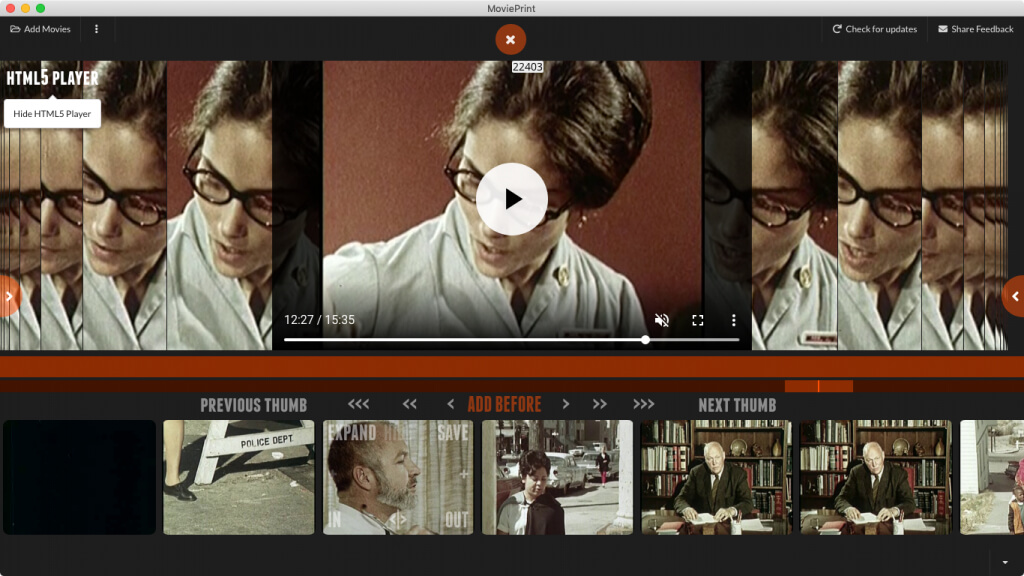
Floating menu on the top

- Back to parent MoviePrint (after having used Expand)
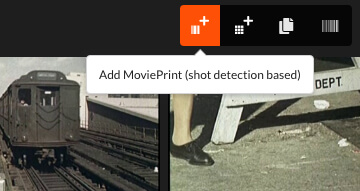
- Add MoviePrint (shot detection based)
- The first time, the movie is scanned
- A MoviePrint is added creating thumbs for every detected shot
- The MoviePrint is displayed in the timeline view
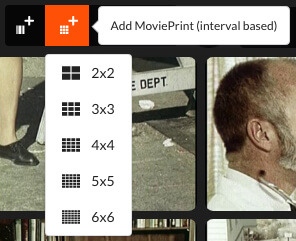
- Add MoviePrint (interval based)
- using presets (2×2, 3×3, 4×4, 5×5, 6×6)
- create custom grids in the
Settings menu
- Duplicate MoviePrint
- Switch between grid and timeline view
- Switch to Player view
- Fit width/height (only for grid view)
- Zoom (only for grid view)
- Show/Hide hidden thumbs
- Show/Hide Header
- set details in the
Settings menu
- set details in the
- Show/Hide frames or timecode
- Show/Hide images
Movie list
- The movie list shows all added movies
- Add one or more movies to the list via drag and drop or the
Add moviesbutton - Clear the movie list via the overflow menu in the header
Clear Movie list - Import a MoviePrint
- Restore a MoviePrint by importing a previously exported JSON or PNG with embedded data. In case the movie location has been changed, use Replace Movie to point to the new location. -> See Export
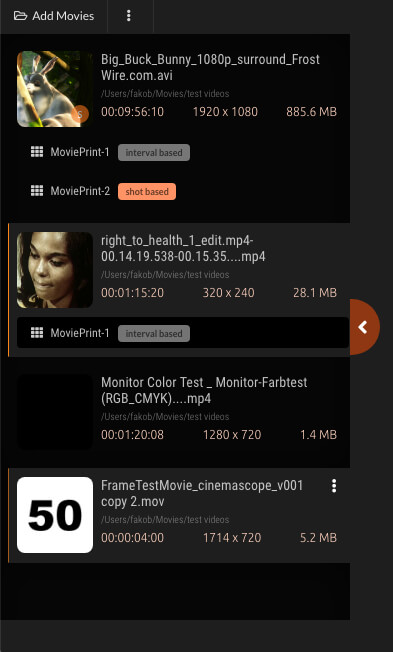
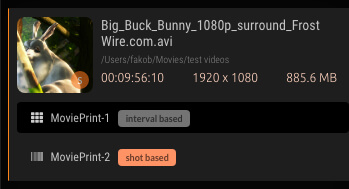
Movie item
- Each movie shows a thumbnail and some information
- Each movie can contain one or more MoviePrints
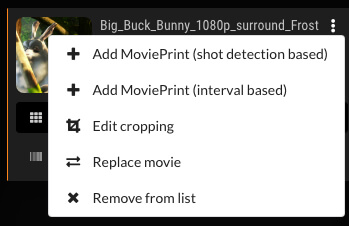
- Remove the movie from the list via the overflow menu of the movie
Remove from list - Add a MoviePrint to a movie via the overflow menu
Add MoviePrint-> See Types of MoviePrints
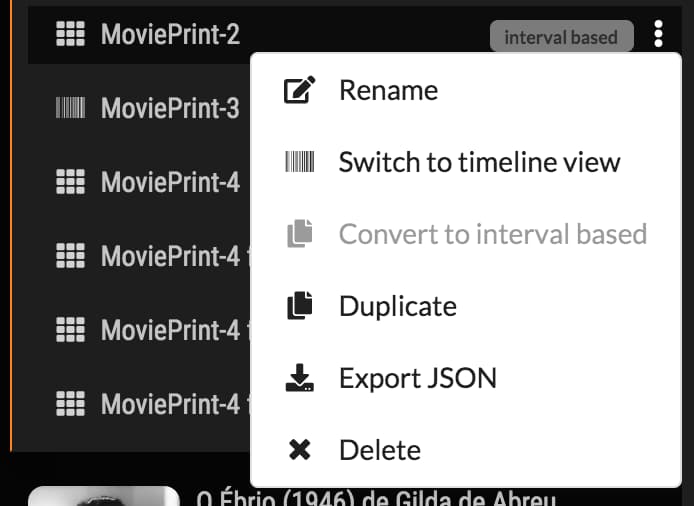
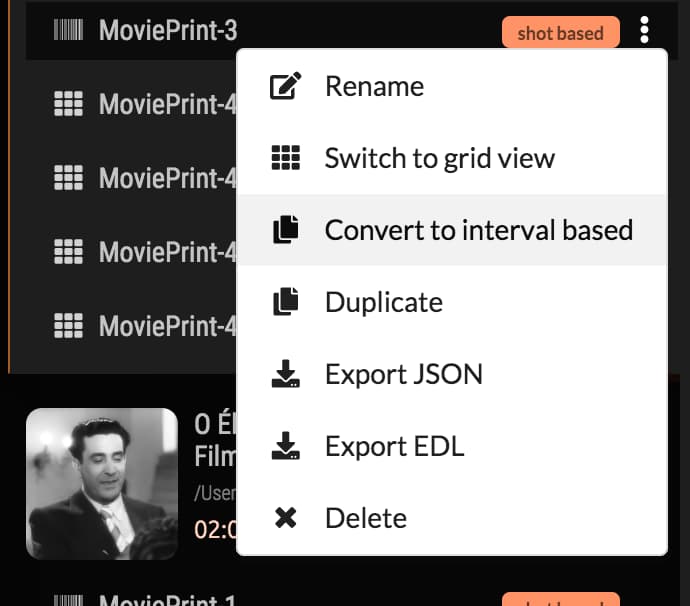
MoviePrint item
Click on the overflow menu to
- Rename the MoviePrint
- Toggle between
Grid viewandTimeline view(also via the floating menu) - Convert to interval based MoviePrint
- This removes the constraints a shot or faces based MoviePrint has
- Duplicate a MoviePrint (also via the floating menu)
- Export the MoviePrint as a JSON file via the overflow menu of the MoviePrint
Export- This file stores
- Path of the movie
- Frame numbers of the visible chosen frames
- Column count
- This lets you restore a MoviePrint at a later time via
Import MoviePrint
- This file stores
- Export a shot based MoviePrint as an EDL to use in e.g. Adobe Premiere
- Remove a MoviePrint via the overflow menu of the MoviePrint
Remove
Settings menu
- Change columns
- Change rows (only interval based MoviePrints)
- Change minutes per row (only shot based MoviePrints)
- Change shot detection threshold (only shot based MoviePrints)
- Show guide layout
- Select guide layout
- Change margin
- Other options
- Show header
- Show file path
- Show file details
- Show timeline
- Rounded corners
- Show hidden thumbs
- Show frames/timecode/no info
- Show header
- Select output path
- Same as movie file
- Set output size
- Set output format
- Set save options
- Overwrite existing
- Include individual frames
- Embed frame numbers (only PNG)
- Embed file Path (only PNG)
- Experimental
- Show detection chart
- Automatic detection of In and Outpoint
- Show input field instead of slider
- Set max size of cached frames

Embed data when saving a MoviePrint (PNG only)
File path, column count and the selected frame numbers are embedded into the PNG file. This lets you restore a MoviePrint at a later time via Import MoviePrint. Embedding the data is activated by default. This can be changed in the settings menu.
Keyboard shortcuts
- General
- 1 – Show/Hide Movie list
- 2 – Show/Hide Player view
- 3 – Show/Hide Settings
- A – Add Movies
- F – Show/Hide shot detection chart
- G – Toggle between grid view and timeline view
- M – Save MoviePrint
- S – Add MoviePrint (shot detection based)
- For player view
- SPACE – Toggle between Cut/Merge and Change thumb mode
- SHIFT + Arrow left/right – Move 1 frame back/forward
- Arrow left/right – Move 10 frames back/forward
- ALT + Arrow left/right – Move 100 frames back/forward
- For Cut/Merge mode
- SHIFT + ALT + Arrow left/right – Jump to previous/next cut
- ENTER – Cut/Merge shot(s)
- For Change thumb mode
- SHIFT + ALT + Arrow left/right – Jump to previous/next thumb
- ENTER – Change thumb to use shown frame
Debug MoviePrint
How to get logs and console output
- Go to MoviePrint’s View menu
- Click on Restart in debug mode
- MoviePrint starts anew (as before)
- Go to MoviePrint’s Development menu
- Click on Show log file
- A file explorer opens and points to one or more log files
- Zip all log files
- Inside the window of the MoviePrint app
- Go to ‘Developer Tools’ menu
- Click on Console
- The console output of the renderer is shown
- Take a screenshot of the console output